

How To Nail Chair Rail
How to Install a Chair Rail
Updated: Jun. 12, 2019
Learn how to install chair rail molding that will take your habitation from ordinary to elegant in 1 weekend.

Chair rail molding can transform the appearance of your living room, dining room or hallway, and installation goes chop-chop when you prefinish the wood.
You might too like: TBD
- Time
- Complexity
- Cost
- Multiple Days
- Intermediate
- Varies
All about chair track molding
The original purpose of chair track molding, specifically dining room chair track, was to protect walls from existence damaged by chair backs. Today, this chair runway molding is a fast style to stylishly define a dining room, living room or entry hall, specially when used to separate wallpaper from paint, or between 2 unlike colors of paint.
This article will testify yous how to install chair rail molding, with tips to brand the job get faster and easier and with less wasted material. Chair runway is available in a diverseness of woods and styles, from cheap paint-grade pino to big, very expensive hardwood profiles. You can also brand your own chair rail molding with standard trim or clear "1-by" material. The special-society ruby-red molding we used cost $5 per ft.
To cut the chair rail, you lot'll need a miter saw and a coping saw with actress blades (they break easily). A terminate nailer isn't absolutely necessary but will give yous faster, better results.
Brand a sketch, then go shopping
Sketch out the floor program of the room, noting the exact length of each section of wall. Add a foot to each length for waste material to become the minimum size y'all need for each wall. In one case you decide on a style, you'll need to exercise some juggling to make the standard lengths that the lumberyard sells fit the lengths that yous need. The best way to go on track of what piece goes where and avoid wasting expensive wood is to brand notes on the sketch. Here are some shopping tips:
- When possible, buy pieces of chair track molding long enough to span the entire wall; otherwise, you'll have to splice
sections (Photo seven). - If you plan to stain and varnish the chair molding, select pieces with similar grain pattern and color.
- Check each slice for flaws such as splits and tear-out.
- To avoid heavy sanding, select pieces that have a polish surface. Watch out for deep "churr marks" (a wavy surface left by the milling car).
- Home centers only carry a few pine and oak chair rails. For a larger selection, inquire most special-order chair railing profiles or visit a lumberyard that caters to professional contractors.
- Many types and combinations of moldings can exist used as chair rail, even if they aren't called chair rail.
Also use your sketch to plan the location of coped cuts, so that you don't finish up with pieces that take to be coped at both ends. If possible, locate coped pieces on walls where the non-coped terminate can exist marked in place. That mode you can shave the coped cut downward, or even recut it if you have to, before you cut information technology to length. Even pros take to tweak their cuts, so get out yourself a little actress woods to work with.
Become Amend Results With an Air Nailer
Until the 1990s, air nailers were so expensive that many carpenters didn't use them. They're a whole lot cheaper now; even if you exercise only occasional carpentry, they're well worth the investment. Not only can y'all nail trim faster and easier, simply you'll get meliorate-looking results. The skinny nails are less probable to dissever woods, and they leave smaller holes that are easier to hide. Hammer dents and bent nails are no longer a business organisation.
Ready the walls

Photo 1: Marker studs
Locate studs and mark them with masking tape. If new wallpaper or paint is function of the project, complete those jobs before you install chair runway.
How High is a Chair Rails?
Apply wallpaper or pigment loftier enough (or low enough) for the chair runway to embrace the edge. Chair runway height is commonly 36 in. higher up the floor just tin can exist installed anywhere from 30 in. to 42 in., with wallpaper either above or below.
Lightly marker the lesser of the chair rail every 3 ft. around the perimeter of the room. Measure from the baseboard, the ceiling or the floor—whichever is most consistent. Find and mark all the studs (Photo one).
Carve up the Deviation
In older houses, where level floors and ceilings may be only a distant retention, perfectly level chair rail tin actually look kleptomaniacal. The best solution is to ignore the level and follow a compromise line halfway between level and the closest visual reference point—unremarkably the baseboard. If in doubt, tack up a test piece or a piece of tape, so stand back and meet if information technology looks correct.
Prefinish for a faster, neater chore
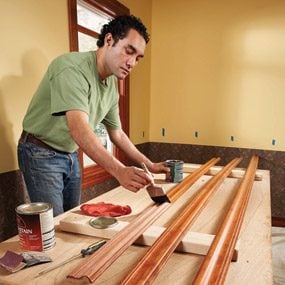
Photo 2: Cease before installing
Prefinish the chair rail molding for less mess and smoother results. Utilize the final glaze after installing the chair rail and filling nail holes.
For a job with sharp, well-baked edges, stain and varnish (or pigment) the chair track before nailing it up (Photo 2). Earlier the beginning coat, sand all the chair rail lightly but thoroughly with 180-grit sandpaper. Examination the finish on scrap pieces to brand sure the colour looks correct. To lucifer existing trim, yous'll have to experiment on scraps of chair rails. Don't assume that stain colors will wait the same on your chair runway as they do on store displays.
Cope corners for a perfect fit
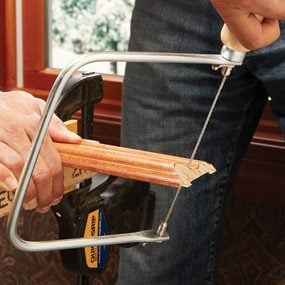
Photo 3: Cope cuts
Cope inside corners by cutting along the profile left by a 45-degree miter cut. Hold the coping saw at an angle to "backcut" the chair rail.
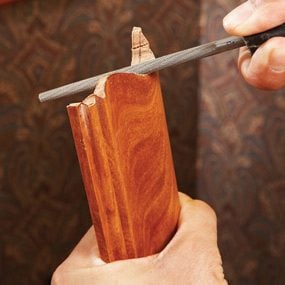
Photograph 4: Fine-tune the cut
Perfect the fit of coped ends with a file, rasp, utility knife or sandpaper. Don't try to shave off thin slices with a coping saw.

Photo 5: Solve problems with hidden shims
Close a gap with a shim. Slip the shim under the uncoped end to force it against the coped terminate. This merely works if the gap is forth the lower half of the chair railing joint.
Wall corners are almost never perfectly foursquare, but coped joints cover this problem by plumbing fixtures tightly against the bordering piece even if the corner is a few degrees off.
Cut the slice for the get-go side of the corner at 90 degrees and nail it in place—but proceed the nails a foot dorsum from the corner for now. Cutting the coped end of the side by side piece and tweak it until the joint is tight (Photos three and 4).
Here are some tips for making smooth, accurate cope cuts:
- Brand sure the saw teeth signal toward the handle. That way, the blade volition cut smoothly on the pull stroke.
- Practice on scraps. You'll be surprised at how much your copes meliorate after a couple of do cuts.
- Clench the chair rail to a solid work surface. Cuts are smoother and easier if the molding can't
shift or wiggle. - Don't force the saw forward. Brand smooth, even strokes, applying light forward pressure.
If the commencement wall isn't perfectly plumb, yous may need to glue a thin shim under the bottom edge to tighten the joint (Photograph 5). Don't cut off the shim in place—you may harm the wall. Instead, marker it, and so pull it out
to cut information technology.
Once the coped joint looks right, concur it in place and mark the cut at the other end. But i end should be coped. The other end will always be either an outside corner or a 90-degree cut. Here's more than on creating coped corners.
Test exterior corners for a tight fit
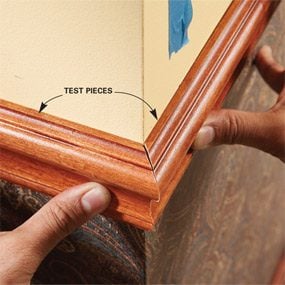
Photograph 6: Utilize scraps for examination cuts
Find the miter cut bending on exterior corners with an angle finder or just by cutting and recutting exam pieces until they form a tight corner.
Exterior corners often flare out slightly, so that the chair rail needs to be cut at more than 45 degrees. To go the verbal angle, cut two bit pieces at 46 degrees, then accommodate the angle of the cut until the joint is tight (Photograph 6). Both sides should be cut at the same angle.
Spread wood gum on ane of the ends before nailing the chair railing pieces to the wall. Don't nail inside 2 in. of the end unless y'all're using a brad nailer or predrilling, to avoid splitting the wood.
Create a "Render" at an Archway
To stop chair runway at an entrance or corner, form a render an inch from the corner. When y'all cut the render, leave the saw bract downwardly until the blade stops spinning to avoid nicking the return as it falls away from the blade.
First, cut a render piece the width of the chair track. Clamp a i×four to the fence so the saw blade won't mangle the return.
Next, push the render into place with a trivial wood glue and concur information technology for a minute until the glue starts to set. Don't nail the render—it's also small.
Splice long runs of chair rail
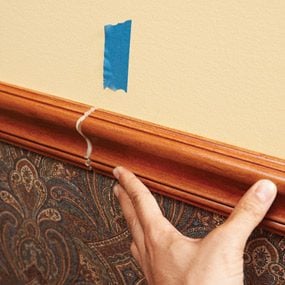
Photo vii: Scarf articulation
Join sections of chair rail with a thirty-degree "scarf" joint at a stud. For a strong joint, use glue in addition to nails.
If your wall is too long for a unmarried slice of chair rail, you tin can inconspicuously join ii pieces past cutting the ends at 30 degrees and gluing them together (Photo seven).
Select ii chair railing pieces with like grain. Measure and cutting the two pieces then that the splice occurs on a stud. Position the top slice so that all the edges line upwards, and then smash information technology to the wall. Wipe away gum drips and touch up with filler and additional finish if necessary.
Cut a "Bevel" at Thin Window Casing
Some types of chair rail molding are thicker than window and door casing. To solve this problem, bevel-cut the chair rail every bit shown in the photo with a shallow 45-caste bevel cut. Apply finish to the cutting before you nail it up to avert getting stop on the casing.
Fill nail holes
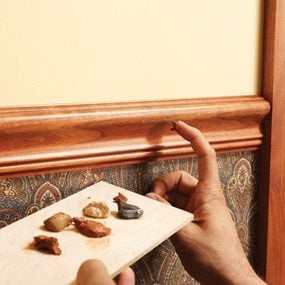
Photograph eight: Fill holes
Fill up nail holes with colored putty. Blend different colors of putty to perfectly match the color of the wood. Then apply the concluding coat of articulate finish.
Before applying the last glaze of end, fill all nail holes. Apply colored wood putty—either oil or water-based—to fill up holes in natural woodwork (Photo eight). If you don't have the right shade, blend dissimilar colors with your fingers for a better match. Wipe abroad backlog filler with a rag dipped in thinner for the oil-based putty, or h2o for the water-based product.
Use spackling paste for painted chair track molding. Sand information technology flush, spot-prime the nail holes, then repaint.
Figure A: Plate or Chair Rails Design
The techniques used to install a chair runway molding can as well exist used to brand a plate runway or a heavier, built-up chair rail. In addition to being visually interesting, a built upwardly chair runway molding like this can exist used to display photos, artwork and knickknacks. Plate rails are ordinarily installed virtually v feet higher up the floor.
Required Tools for this Projection
Have the necessary tools for this DIY chair rail molding projection lined upward before you first—you'll salve fourth dimension and frustration.
Required Materials for this Project
Avoid last-minute shopping trips past having all your materials gear up alee of time. Here'due south a listing.
Originally Published: January 10, 2019

How To Nail Chair Rail,
Source: https://www.familyhandyman.com/project/how-to-install-a-chair-rail/
Posted by: boydblet1970.blogspot.com
0 Response to "How To Nail Chair Rail"
Post a Comment